Programming Raspberry Pi by Examples


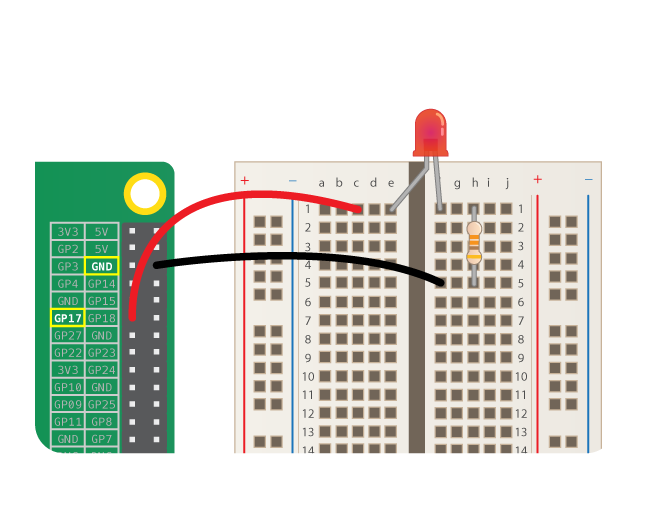
Example 1: Programmatically controlling the LED


  • Join the Raspberry Pi Course (link
  • Implement LED connection in the course week 2 lecture (link) .


Example 2: Using the DHT11 - Humidity and Temperature Sensor with Raspberry Pi:


The example in Uugear (link) did not work because my DHT11 had the pins in different order the pins were marked + and - rather than S, V and G.

So I connected :


  • + symbol in DHT11 ------> 3.3V
  • - symbol in DHT11 ------> GND
  • out symbol in DHT11 ------>  pin GP4

Also I used this github library (easy to understand) : https://github.com/szazo/DHT11_Python


Example 3: IR Controlling your TV and AC with Raspberry Pi


These 2 tutorial were followed to do this example:

1. http://www.raspberry-pi-geek.com/Archive/2015/10/Raspberry-Pi-IR-remote (main)
2. http://alexba.in/blog/2013/01/06/setting-up-lirc-on-the-raspberrypi/ (helped to resolve issues)
3. https://blog.bschwind.com/2016/05/29/sending-infrared-commands-from-a-raspberry-pi-without-lirc/ (to learn about IR reciever)


Extra Steps :

The above tutorial 1 had 2 missing steps that I am documenting below.

Step 1: Run the following command before restart (or I was getting the error [1]):


lircd -d /dev/lirc0 
[1] irsend: hardware does not support sending raspberry pi

Step 2: The key blocker I was facing was that the IRSEND command was working fine but the TV was not getting any signal. Eventually, the issue was fixed by doing the following (from the 2nd link above):
//edit the /boot/config.txt and add: 
dtoverlay=lirc-rpi,gpio_in_pin=23,gpio_out_pin=22

Notes:

My TV Remote Control: irsend SEND_ONCE LG_AKB73715601 KEY_MENU

Notes: When trying to control the Air Condition using Raspberry Pi, I was unable to find the config files for my particular AC model from the current lirc repo. Eventually purchased and IR receiver LED and recorded the IR signals from original remote control using lirc record feature (already documented in the above links). Later it was very simple to fire the recorded keys and the AC was controlled successfully. 
Comments

Popular posts from this blog

Building Autonomous Drone with Raspberry Pi and APM 2.8

I am a total newbie to hardware and was pushing my limits to see how far I can reach on with hardware projects (which sparked my interest lately). I have set out on a very ambitions mission  to control a drone from raspberry pi .I began the research for this around 2 months ago and had brought a raspberry pi, drone body kit and apm flight controller. The key difference of this project from common drone projects is that I'm trying to avoid the use of and RC and instead use the raspberry pi to control it.  Hardware Ins tallation Setup: I am using APM 2.8 and Mission Planner. I am using RPi 3 to control the APM 2.8 via Telem port of APM I am planning to power the apm via the battery to ESC (Electronic Speed Controllers) Now, documenting my steps below: Day 1 Watch Tutorial To get started with APM flight controller, I watched this video tutorial [1] which gives a gentle introduction about APM board.  Setup APM board and Calibrate Sensors I downloade...

Adafruit GFX - How to change line spacing in text?

  You may want to update the line spacing to be a little lower than default due to small screen size on IoT devices. I faced this challenge while working on a Watchy hobby project. You may have used a font generator or just using the default fonts and got a *.h file that has the details of the font. In that case just change the last integer value in the PROGMEM variable.

Data Mining & Analytics with R : Running R Scripts and Data Mining Techniques - Day 2

Warning: These are my messy study notes, much better legible notes can be found here  http://onepager.togaware.com 1. A Tour Thru Rattle Transform Tab ( by no means near to the full power of underlying R) Data Mining Tabs - Cluster, Associate Model Log Tab  - Capture the corresponding R command Working from Left to Right on Tabs  Remember to Click Execute Button 'Save' -> Projects save the current state, all models etc. 'Open' Projects can be restored at a later time You can even load it back to R  2. First R Program Load rattle and ggplot2 library(rattle)  # Provides the weather dataset  library(rattle)  # Provides the ggplot() function ggplot -> Grammar of Graphics : Just like english grammar or grammar of a computer language. A result of Hadley's Phd . Look him up to learn more details. Then produce a plot using ggplot() # handsondatascience.com - tips on elegantly writing repeated code ds ...